URBAN VAN

What Is an ICBC Security Keyword, and Why Isn’t Your Mother’s Name Always a Good Choice?


Imagine visiting ICBC and being asked, “What is your mother’s name?” or “What is your mother’s last name?” You know the answer, but you cannot remember exactly how you spelled it when your record was created.

This problem is more common with long names or names that have several possible English spellings. Persian examples include «قمرالملوک» (Ghamar-ol-Molouk), «خیرالنسا» (Kheyr-ol-Nesa) and «کلاه‌بلند دوغ‌آبادی» (Kolahboland Doughabadi).

The same issue can occur with Korean names such as 서연 (Seo-yeon / Seoyeon / Suh-yeon) or 지혜 (Ji-hye / Jihye / Ji Hye), and Japanese names such as ゆうこ (Yuko / Yuuko).

Although these spellings may refer to the same name, your answer must match the spelling originally recorded in your ICBC file.

What Is an ICBC Security Keyword?

When your driver’s licensing record is first created, you may be asked to choose a security keyword.

This keyword acts as a security answer and may be requested to help confirm your identity when you contact ICBC, visit a Driver Licensing office or use certain ICBC services.

The staff member may not always say, “Please provide your security keyword.” Instead, you may be asked:

  • What is your mother’s name?

  • What is your mother’s last name?

  • What word or number did you provide for your file?

As a result, some people may not realize that the staff member is asking for the security keyword recorded in their file.

Why Can a Mother’s Name Cause Problems?

Many people choose their mother’s first or last name as their security keyword. This may initially seem simple, but it can become difficult if the name is long, contains several parts or has more than one possible English spelling.

You may remember the name correctly but not remember whether you entered it with a space, a hyphen or a particular combination of English letters.

This is especially common among newcomers because many Persian, Korean, Japanese, Chinese, Taiwanese, Mongolian, Kazakh, Uzbek and Afghan names can be written in English in several different ways.

What Should You Choose as Your Security Keyword?

Choose something that you can easily remember and spell without hesitation. For example:

  • The last four digits of your current or previous telephone number;

  • Your own last name;

  • The name of one of your children;

  • A short, familiar word;

  • A simple combination of a word and a few numbers.

The most important thing is to remember the exact answer and spelling you selected. You may also keep it written in a secure place for your own reference.

The security keyword is only one part of the identity-verification process. ICBC staff also review your file, identification and other verification information or codes. Your keyword does not need to be unnecessarily complicated; something memorable is usually more practical.

What If You Do Not Understand the Question?

If an ICBC staff member asks about your mother’s name, your mother’s last name or another specific word, and you are unsure what they mean, do not guess. You can ask:

Are you asking for my ICBC security keyword?

You can always ask the staff member to explain the question or guide you through the process.

What If You Have Forgotten Your Security Keyword?

If you have forgotten your security keyword or its exact spelling, do not worry. It can be changed.

Ask ICBC for assistance. You may need to visit an ICBC Driver Licensing office with the required identification so your identity can be verified and a new security keyword can be added to your file.

Does a Driving School Need Your Security Keyword to Book a Road Test?

Urban Driving Academy does not ask students to send us their ICBC security keyword.

If we need to book a road test for a student, we first send the student a Consent Form. Once the form is signed, the test is booked through the driving school’s account. Therefore, the student does not need to provide their ICBC security keyword to the school.

Do Not Send Your Security Keyword to Unknown Individuals

If an unknown person asks you by text message, email or telephone to provide your ICBC security keyword, first confirm their identity and why they are requesting it.

When a road test is booked through Urban Driving Academy, we obtain a signed Consent Form and do not require the student’s security keyword.

Summary

An ICBC security keyword helps confirm your identity. Choose a short, familiar and memorable word or number, and make sure you remember its exact spelling.

If you do not understand the question, ask for clarification. If you have forgotten your keyword, contact ICBC for help changing it rather than guessing.
URBAN VAN

کلمه امنیتی آی‌سی‌بی‌سی چیست و چرا نام مادر همیشه انتخاب خوبی نیست؟

فرض کنید هنگام مراجعه به ICBC، کارمند از شما بپرسد: «نام مادرتان چیست؟» یا «نام خانوادگی مادرتان چیست؟» شما پاسخ را می‌دانید، اما یادتان نیست هنگام تشکیل پرونده آن را با چه املایی ثبت کرده‌اید.

این مشکل برای نام‌های طولانی یا نام‌هایی که چند املای انگلیسی دارند بیشتر پیش می‌آید؛ برای مثال نام‌هایی مانند «قمرالملوک»، «خیرالنسا» یا «کلاه‌بلند دوغ‌آبادی». همین مسئله ممکن است درباره بعضی نام‌های کره‌ای مانند Seo-yeon / Seoyeon / Suh-yeon یا Ji-hye / Jihye / Ji Hye و نام‌های ژاپنی مانند Yuko / Yuuko نیز پیش بیاید.

همه این شکل‌ها ممکن است از نظر تلفظ به یک نام اشاره داشته باشند، اما پاسخ باید با همان املایی مطابقت داشته باشد که قبلاً در پرونده ICBC ثبت شده است.

کلمه امنیتی ICBC چیست؟

هنگامی که برای نخستین بار پرونده گواهینامه رانندگی خود را در ICBC تشکیل می‌دهید، از شما خواسته می‌شود یک Security Keyword یا کلمه امنیتی انتخاب کنید.

این کلمه مانند یک پاسخ امنیتی عمل می‌کند و ممکن است هنگام تماس، مراجعه حضوری یا استفاده از برخی خدمات ICBC برای تأیید هویت از شما پرسیده شود.

گاهی کارمند مستقیماً نمی‌گوید: «کلمه امنیتی خود را بگویید» و ممکن است به‌جای آن بپرسد:

  • نام مادرتان چیست؟
  • نام خانوادگی مادرتان چیست؟
  • کلمه یا عددی که در پرونده ثبت کرده‌اید چیست؟

به همین دلیل، ممکن است شخص متوجه نشود که کارمند در واقع کلمه امنیتی ثبت‌شده در پرونده را می‌خواهد.

چرا نام مادر ممکن است باعث مشکل شود؟

بسیاری از افراد نام یا نام خانوادگی مادرشان را به‌عنوان کلمه امنیتی انتخاب می‌کنند. این انتخاب ممکن است در ابتدا ساده به نظر برسد، اما اگر نام طولانی، چندبخشی یا دارای چند املای انگلیسی باشد، بعداً یادآوری شکل دقیق آن دشوار می‌شود.

برای مثال، ممکن است شخص نام مادرش را درست به خاطر داشته باشد، اما نداند آن را با فاصله، خط تیره یا با کدام ترکیب از حروف انگلیسی ثبت کرده است.

این موضوع برای بسیاری از تازه‌واردان پیش می‌آید، زیرا بعضی نام‌های فارسی، کره‌ای، ژاپنی، چینی، تایوانی، مغولی، قزاق، ازبک و افغان را می‌توان به چند شکل با حروف انگلیسی نوشت.

چه کلمه امنیتی‌ای انتخاب کنیم؟

بهتر است چیزی را انتخاب کنید که همیشه به‌آسانی به خاطر بیاورید و بتوانید املای آن را بدون تردید بیان کنید. برای مثال:

  • چهار رقم آخر شماره تلفن فعلی یا قبلی شما؛
  • نام خانوادگی خودتان؛
  • نام یکی از فرزندانتان؛
  • یک کلمه کوتاه و آشنا؛
  • ترکیبی ساده از یک کلمه و چند عدد.

مهم‌ترین نکته این است که پاسخ انتخابی و شکل دقیق نوشتن آن را فراموش نکنید. می‌توانید آن را در محلی امن برای خودتان یادداشت کنید.

کلمه امنیتی تنها بخش فرایند تأیید هویت نیست. کارمند ICBC پرونده، مدارک و سایر اطلاعات یا کدهای تأییدی را نیز بررسی می‌کند. بنابراین لازم نیست کلمه‌ای بسیار پیچیده و دشوار انتخاب کنید؛ چیزی که به‌راحتی در خاطرتان بماند معمولاً کاربردی‌تر است.

اگر سؤال کارمند را متوجه نشدیم چه کنیم؟

اگر کارمند ICBC درباره نام مادر، نام خانوادگی مادر یا یک کلمه خاص سؤال کرد و مطمئن نبودید منظور او چیست، حدس نزنید. می‌توانید بپرسید:

Are you asking for my ICBC security keyword?

یعنی:

آیا منظورتان کلمه امنیتی ICBC من است؟

همیشه می‌توانید از کارمند بخواهید سؤال را توضیح دهد یا شما را راهنمایی کند.

اگر کلمه امنیتی را فراموش کرده باشیم چه می‌شود؟

اگر کلمه امنیتی یا املای دقیق آن را فراموش کرده‌اید، نگران نباشید. این کلمه قابل تغییر است.

برای تغییر آن، از ICBC راهنمایی بگیرید. ممکن است لازم باشد با مدارک شناسایی خود به یکی از دفاتر Driver Licensing مراجعه کنید تا هویت شما بررسی و کلمه امنیتی جدیدی برای پرونده ثبت شود.

آیا آموزشگاه رانندگی برای رزرو آزمون به کلمه امنیتی نیاز دارد؟

در آموزشگاه رانندگی ایربن (Urban Driving Academy) از شاگردان نمی‌خواهیم کلمه امنیتی ICBC خود را برای ما ارسال کنند.

اگر قرار باشد آزمون جاده‌ای برای شاگرد رزرو کنیم، ابتدا Consent Form یا فرم رضایت را برای او می‌فرستیم. پس از امضای فرم، رزرو از طریق حساب کاربری آموزشگاه انجام می‌شود؛ بنابراین نیازی نیست شاگرد کلمه امنیتی خود را در اختیار آموزشگاه قرار دهد.

کلمه امنیتی خود را برای افراد ناشناس ارسال نکنید

اگر فرد ناشناسی از طریق پیام، ایمیل یا تماس تلفنی از شما خواست کلمه امنیتی ICBC خود را برای او بفرستید، ابتدا هویت او و دلیل این درخواست را بررسی کنید.

برای رزرو آزمون از طریق آموزشگاه رانندگی ایربن، فرم رضایت رسمی دریافت می‌شود و نیازی به ارائه کلمه امنیتی شاگرد نیست.

جمع‌بندی

کلمه امنیتی ICBC برای کمک به تأیید هویت شما استفاده می‌شود. بهتر است از همان ابتدا کلمه یا عددی انتخاب کنید که کوتاه، آشنا و به‌یادماندنی باشد و املای آن را دقیق بدانید.

اگر سؤال کارمند را متوجه نشدید، حتماً سؤال کنید. اگر پاسخ را فراموش کرده‌اید، از ICBC برای تغییر آن کمک بگیرید و هرگز از روی حدس پاسخ ندهید.

IMG_4362

بهترین زمان راهنما زدن و شولدرچک برای گردش به راست

گردش به راست در ظاهر ساده است، اما زمان راهنما زدن، بررسی آینه و انجام شولدرچک می‌تواند تفاوت میان یک گردش ایمن و یک موقعیت خطرناک را رقم بزند. بسیاری از هنرجویان می‌دانند که باید راهنما بزنند و شولدرچک کنند، اما دقیقاً نمی‌دانند هرکدام را چه زمانی انجام دهند.

راهنما، آینه و شولدرچک وظایف متفاوتی دارند

راهنما تصمیم شما را به سایر کاربران جاده اعلام می‌کند. آینه به شما کمک می‌کند وضعیت ترافیک پشت و اطراف خودرو را بررسی کنید و شولدرچک نیز نشان می‌دهد که فضای نقطه کور در سمت راست خودرو واقعاً خالی است.

هیچ‌کدام جای دیگری را نمی‌گیرد. شولدرچک بدون بررسی آینه به‌اندازه کافی دقیق و کامل نیست. بنابراین همیشه به یاد داشته باشید:

ابتدا آینه، سپس شولدرچک.

چه زمانی برای گردش به راست راهنما بزنیم؟

راهنما باید آن‌قدر زود زده شود که رانندگان، دوچرخه‌سواران و عابران پیاده فرصت کافی برای درک تصمیم شما داشته باشند؛ اما نه آن‌قدر زود که باعث سردرگمی شود و دیگران تصور کنند قصد ورود به کوچه، پارکینگ یا مسیر دیگری را دارید.

در شرایط معمول، پیش از کم‌کردن سرعت و نزدیک‌شدن به محل گردش، آینه را بررسی کنید و راهنمای راست را بزنید. راهنما را تا پایان گردش روشن نگه دارید.

فراموش نکنید که راهنما فقط تصمیم شما را اعلام می‌کند و به‌معنای خالی یا ایمن‌بودن مسیر نیست.

چه زمانی شولدرچک سمت راست را انجام دهیم؟

شولدرچک را خیلی زود انجام ندهید؛ زیرا ممکن است پس از نگاه‌کردن شما، دوچرخه‌سوار، عابر پیاده، اسکوتر، موتورسیکلت یا خودروی دیگری وارد نقطه کور شود.

درعین‌حال، شولدرچک را تا زمانی به تأخیر نیندازید که خودرو گردش را شروع کرده باشد. گردش‌کردن درحالی‌که سر شما هنوز به سمت عقب است، کنترل خودرو و مشاهده مسیر روبه‌رو را دشوار می‌کند.

روش درست این است:

کمی پیش از گردش، شولدرچک سریع و هدفمند سمت راست را انجام دهید، نگاهتان را به جلو برگردانید و سپس در صورت ایمن‌بودن مسیر گردش کنید.

هدف فقط انجام‌دادن شولدرچک نیست

ما شولدرچک نمی‌کنیم که صرفاً به ممتحن نشان دهیم این حرکت را انجام داده‌ایم. هدف واقعی آن است که دوچرخه‌سوار، عابر پیاده، اسکوتر، موتورسیکلت یا وسیله نقلیه‌ای را که در نقطه کور قرار دارد ببینیم.

بنابراین فقط سر خود را به‌صورت نمایشی حرکت ندهید. نگاه کنید و مطمئن شوید فضای سمت راست و مسیر گردش واقعاً خالی و ایمن است.

زمان شولدرچک به شرایط بستگی دارد

زمان مناسب شولدرچک در یک گردش بدون توقف، پشت تابلوی ایست و هنگام گردش به راست در چراغ قرمز یکسان نیست.

۱. گردش به راست بدون توقف

اگر چراغ سبز است یا توقفی در مسیر ندارید، پیش از کم‌کردن سرعت آینه را بررسی کنید و راهنما بزنید. تقاطع، خط عابر، مسیر دوچرخه و فضای سمت راست خودرو را زیر نظر داشته باشید.

کمی پیش از رسیدن به محل گردش، زمانی که خودرو هنوز مستقیم و کاملاً تحت کنترل است، شولدرچک سمت راست را انجام دهید. سپس نگاهتان را به جلو برگردانید و در صورت ایمن‌بودن مسیر گردش کنید.

اگر مجبور شدید چند ثانیه منتظر بمانید یا توقف کنید، شولدرچک قبلی ممکن است دیگر معتبر نباشد و باید دوباره وضعیت را بررسی کنید.

۲. گردش به راست پس از تابلوی ایست

پیش از کم‌کردن سرعت، آینه را بررسی کنید و راهنمای راست را بزنید. سپس در محل قانونی، توقف کامل انجام دهید و تقاطع، خط عابر، مسیر دوچرخه و ترافیک را بررسی کنید.

کمی پیش از حرکت، آینه سمت راست و نقطه کور را دوباره بررسی کنید، نگاهتان را به جلو برگردانید و سپس در صورت ایمن‌بودن مسیر گردش کنید.

اگر شولدرچک پیش از توقف کامل انجام شده باشد، ممکن است بیش‌ازحد زود باشد؛ زیرا در مدتی که توقف کرده‌اید، شرایط می‌تواند تغییر کند.

۳. گردش به راست در چراغ قرمز

ابتدا راهنمای راست را بزنید و در محل قانونی توقف کامل کنید. مطمئن شوید تابلوی No Turn on Red وجود ندارد. سپس خط عابر، مسیر دوچرخه، تقاطع، عابران و ترافیک نزدیک‌شونده را به‌دقت بررسی کنید.

کمی پیش از حرکت، آینه سمت راست را نگاه کنید و شولدرچک نهایی سمت راست را انجام دهید. بعد نگاهتان را به جلو برگردانید و تنها درصورتی گردش کنید که مسیر کاملاً ایمن باشد.

اگر مدتی منتظر ماندید یا چراغ و شرایط ترافیک تغییر کرد، دوباره آینه و نقطه کور را بررسی کنید.

هنگام شولدرچک باید دنبال چه چیزی باشیم؟

پیش از گردش به راست، به‌دنبال این موارد باشید:

  • دوچرخه‌سوار در مسیر دوچرخه یا کنار خودرو
  • عابر پیاده‌ای که وارد خط عابر می‌شود
  • اسکوتر یا موتورسیکلت در نقطه کور
  • خودرویی که از سمت راست نزدیک می‌شود
  • هر مانع یا خطری که ممکن است وارد مسیر گردش شود

هدف این است که پیش از حرکت مطمئن شوید سمت راست خودرو و مسیر گردش خالی است.

شولدرچک زمان انقضا دارد

شولدرچک فقط وضعیت همان لحظه را نشان می‌دهد. اگر پس از انجام آن چند ثانیه منتظر ماندید، یک عابر وارد خط عابر شد، دوچرخه‌سواری نزدیک شد یا شرایط ترافیک تغییر کرد، شولدرچک قبلی دیگر کافی نیست.

در چنین شرایطی، دوباره آینه را بررسی کنید و شولدرچک دیگری انجام دهید. این کار تکرار نمایشی نیست؛ بلکه واکنشی منطقی به تغییر شرایط است.

اشتباهات رایج هنگام گردش به راست

  • راهنما زدن پس از شروع کاهش سرعت
  • راهنما زدن بیش‌ازحد زود و گمراه‌کردن دیگران
  • تکیه‌کردن فقط بر آینه
  • انجام شولدرچک بدون بررسی قبلی آینه
  • شولدرچک بیش‌ازحد زود
  • گردش درحالی‌که سر هنوز به سمت عقب است
  • نگاه نمایشی بدون توجه واقعی به نقطه کور
  • اعتماد به شولدرچکی که چند ثانیه پیش انجام شده است
  • فراموش‌کردن عابران و دوچرخه‌سواران هنگام چراغ سبز

راهنما به‌موقع، شولدرچک نزدیک به زمان گردش

برای یک گردش ایمن به راست، راهنما را زودتر بزنید تا دیگران از تصمیم شما آگاه شوند؛ اما شولدرچک نهایی را نزدیک به زمان حرکت انجام دهید تا وضعیت واقعی نقطه کور را ببینید.

ابتدا آینه را بررسی کنید، سپس شولدرچک سریع و هدفمند انجام دهید، نگاهتان را به جلو برگردانید و فقط در صورت ایمن‌بودن مسیر گردش کنید.

در آکادمی رانندگی Urban، به هنرجویان آموزش می‌دهیم که هدف واقعی شولدرچک را درک کنند، نه اینکه فقط برای آزمون سر خود را حرکت دهند. با زمان‌بندی درست و تمرین مداوم، بررسی آینه، راهنما زدن و شولدرچک به بخش طبیعی هر گردش ایمن به راست تبدیل می‌شود.

هوشمندانه برانید؛ با اطمینان قبول شوید.

IMG_4362

When to Signal and Shoulder Check for a Right Turn

Most new drivers know that they should signal and shoulder check before turning right. The more important question is exactly when each action should be completed.

A late signal gives other road users little time to react. A shoulder check completed too early may no longer be reliable when the turn begins. Correct timing is therefore just as important as completing the checks.

Signals, Mirrors and Shoulder Checks Have Different Purposes

Your signal communicates your intention. It tells drivers, cyclists and pedestrians that you are planning to slow down and turn right.

Your mirrors show part of the area behind and beside your vehicle. A shoulder check covers the blind spot that your mirrors cannot show.

A shoulder check without first checking the mirrors does not provide a complete picture. Mirrors and shoulder checks work together; neither replaces the other.

Always remember:

Check the mirror, then check the blind spot.

When Should You Signal?

Check your mirrors first, then activate your right-turn signal early enough to warn others before you slow down or begin the turn.

Do not signal so early that other road users may think you intend to enter an earlier street, driveway or parking lot. Your signal should communicate one clear intention.

Keep the signal on throughout your approach and turn. After completing the turn, make sure it has cancelled.

When Should You Shoulder Check?

Your final right shoulder check should be completed shortly before you begin the turn.

Do not check too early. A cyclist, pedestrian, scooter, motorcycle or vehicle may enter your blind spot after you look. Do not leave it so late that your vehicle has already started turning.

Shoulder checking and steering at exactly the same moment can be difficult and may reduce your control. Treat them as separate but connected actions:

  1. Complete a quick and purposeful right shoulder check.
  1. Return your eyes to the road ahead.
  1. Begin the turn only when the path is safe.

Shoulder check, eyes forward, then turn.

Do not begin steering while your head is still turned backward.

Do Not Shoulder Check Just to Be Seen Doing It

The purpose of a shoulder check is not simply to move your head for the road test. You are checking to determine whether a cyclist, pedestrian, scooter, motorcycle or vehicle is in the blind spot or about to cross your path.

Do not simply perform the movement. Look carefully enough to understand what is beside you and make sure your path is safe.

If someone is present, wait and yield as required. Before moving again, recheck your mirror and blind spot. Once the path is safe, return your eyes to the road ahead and complete the turn.

The Correct Timing Depends on the Situation

The best time to complete the final shoulder check depends on whether you can continue moving, must stop at a stop sign or intend to turn right at a red light.

1. When No Stop Is Required

If the light is green or there is no stop sign, check your mirrors and signal before slowing down. As you approach, scan the intersection, both sides of the crosswalk, the sidewalk and any bike lane.

Shortly before reaching the turning point, while the vehicle is still travelling straight and under control, complete a quick right shoulder check. Return your eyes to the road ahead before steering into the turn.

If a pedestrian, cyclist or traffic condition causes you to stop or wait, the earlier shoulder check may no longer be current. Scan and check again before moving.

2. At a Stop Sign

Signal before slowing down and come to a complete legal stop in the correct position.

After stopping, scan the intersection, crosswalk, bike lane and traffic. Shortly before moving, check the right mirror and complete the final right shoulder check. Return your eyes to the road ahead and turn only when the path is safe.

You may have completed a shoulder check before stopping, but do not rely on it when you are ready to turn. While your vehicle is stopped, another road user may enter the blind spot. Check the mirror and right blind spot again before moving.

3. Turning Right at a Red Light

Signal and come to a complete legal stop. First, check whether a sign prohibits turning on the red light.

Scan the crosswalk, bike lane, intersection and approaching traffic. When a safe opportunity becomes available, check your right mirror and complete a final right shoulder check immediately before moving.

Return your eyes to the road ahead and turn only when it is both legal and safe.

If you remain stopped for several seconds or the light changes before you move, scan and check again. Your earlier observation may no longer be current.

What Should You Check Before Turning Right?

Before beginning the turn, check:

  • The rear-view and right-side mirrors
  • The right blind spot
  • Both sides of the crosswalk
  • The sidewalk and corner
  • The bike lane, if present
  • The road you are entering
  • Traffic signs and signals
  • Pedestrians, cyclists and approaching vehicles

A cyclist or scooter may be travelling beside your vehicle, and a pedestrian may enter the crosswalk after you have slowed down. Your mirror alone cannot show the entire blind spot.

A Shoulder Check Has an Expiry Time

Information from a shoulder check does not remain reliable for long. Traffic conditions can change within seconds.

If you shoulder checked and then waited for a pedestrian, cyclist, traffic light or safe gap, scan again and repeat the mirror and shoulder check before moving.

The most useful shoulder check is one that gives you current information shortly before your vehicle enters the space.

Common Right-Turn Mistakes

Common mistakes include:

  • Signalling at the same moment the turn begins
  • Signalling only after braking has started
  • Signalling so early that the intention becomes confusing
  • Checking the right mirror but not the blind spot
  • Shoulder checking too early and failing to check again
  • Turning while the head is still facing backward
  • Looking backward for too long and losing awareness of the road ahead
  • Checking only for vehicles and forgetting cyclists, pedestrians and scooters
  • Failing to recheck after waiting

A shoulder check should be quick and purposeful. Turn your head far enough to see the blind spot, understand what is there, and return your attention to the road before steering.

Signal in Time, Shoulder Check Close to the Turn

The easiest way to remember the timing is:

Signal in time to warn others. Check the mirror and blind spot shortly before moving. Return your eyes to the road before turning.

At Urban Driving Academy, we teach students to understand the real purpose of a shoulder check—not simply to move their heads for the road test. With correct timing and consistent practice, mirror checks, signalling and shoulder checks become natural parts of every safe right turn.

Drive Smart. Pass with Confidence.

4C303AE1-1C42-48E5-974E-4AB613CFDD0A

How to Read Your ICBC Road Test Results

Receiving your ICBC road test results can be exciting, disappointing or sometimes confusing. Whether you passed or failed, the result sheet contains valuable feedback about your driving skills and the areas that may still need improvement.

The check marks and handwritten notes are not simply a score. They show what the examiner observed during your road test, including your observation habits, space margins, speed control, steering and communication with other road users. Understanding this feedback can help you become a safer and more confident driver.

Is the ICBC Road Test Result Sheet a Simple Scorecard?

The ICBC road test result sheet should not be read like a school exam in which every check mark has the same value. Some mistakes are relatively minor, while others may create an immediate safety risk or lead to a traffic violation.

The examiner considers your overall driving performance, how often a mistake occurs and how serious it is. This means two drivers may receive a similar number of marks but have different final results.

What Does a Checked Box Mean?

A checked box identifies a skill or behaviour that needs attention. It does not necessarily mean that one particular mistake caused you to fail.

Repeated errors may show that a driving habit has not yet become consistent. A single serious action—such as speeding in a school or playground zone, creating a dangerous situation or requiring the examiner to intervene—may also affect the final result.

The handwritten notes are especially useful because they often explain the situation more clearly. Read them together with the checked boxes to understand what happened during the test.

The Five Main Driving Skills

The feedback section is divided into five main categories:

1. Observation

This includes shoulder checks, scanning, mirror checks, 360-degree checks, direction of travel, backing and hazard perception. Good observation means noticing potential risks early and checking properly before moving or changing direction.

2. Space Margin

This category covers lane position, following distance, stopping position, safe gaps, turns, parking margins and your position around other vehicles, cyclists and pedestrians. Maintaining enough space gives you more time to react safely.

3. Speed

The examiner looks at speed maintenance, rolling stops, amber lights, acceleration, deceleration and whether you follow posted speed limits. Drivers must also recognize when the limit changes, especially near schools, playgrounds and construction zones.

4. Steering

This includes general steering control, steering-wheel position and weight transfer. Your steering should be smooth, controlled and appropriate for the situation.

5. Communication

Signals, timing and cancelling the signal are included in this category. Clear communication allows other road users to understand what you intend to do.

A Pass Can Still Include Areas to Improve

Passing the road test does not mean that every part of the drive was perfect. An examiner may still identify habits that should be improved.

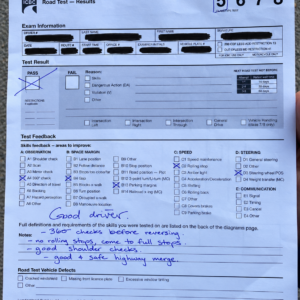
For example, one successful result sheet included positive comments such as “good driver,” good shoulder checks and a good, safe highway merge. However, the same driver was also reminded to complete a 360-degree check before reversing, avoid rolling stops, choose safer gaps and improve parking margins.

This is normal. A passing result means the driver demonstrated the required level of safety and control during the test, but the feedback should still be taken seriously. Passing is great; safe driving is better.

Why Did I Fail If I Made Only a Few Mistakes?

Many drivers are surprised when they fail despite receiving only a few marks. However, a road test is not decided simply by counting the number of checked boxes.

The seriousness of an error matters. A dangerous action, a traffic violation or a situation that requires the examiner to intervene may lead to an unsuccessful result, even when the rest of the drive is reasonably good. Repeating the same mistake can also show that a skill is not yet consistent.

Instead of focusing only on how many marks you received, consider what happened, how serious it was and whether the same error occurred more than once.

A Real Example: Good Driving, One Serious Violation

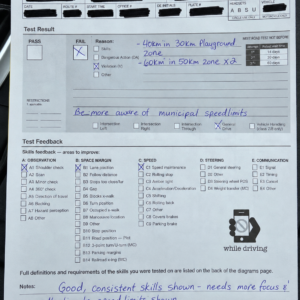
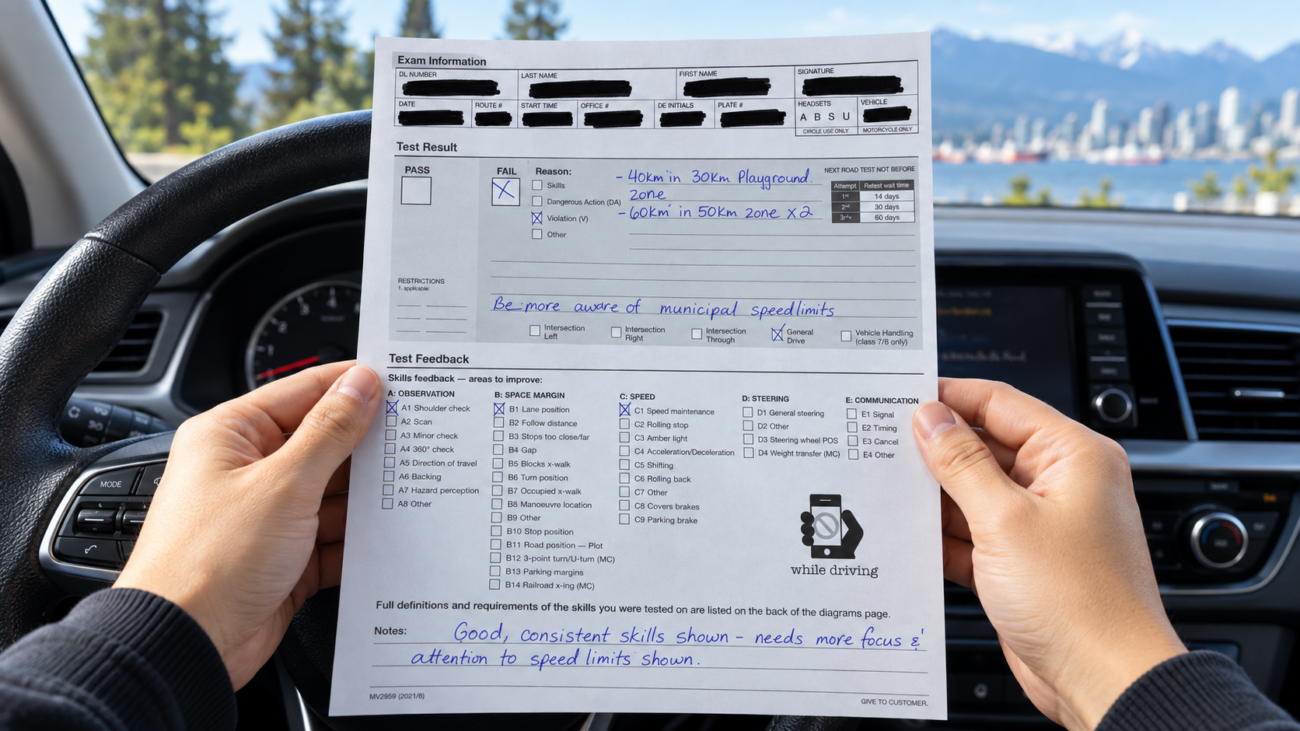
One of the unsuccessful result sheets shown in this article offers a useful example. The examiner wrote that the driver demonstrated “good, consistent skills,” but also noted that the driver needed more focus and attention regarding posted speed limits.

According to the examiner’s notes, the driver travelled at 40 km/h in a 30 km/h playground zone and failed to recognize a 50 km/h zone more than once. Although many other parts of the drive were completed well, the speed-limit violation affected the final result.

This example shows why knowing the posted speed limit is not enough. Drivers must continually scan for signs and adjust their speed as soon as the limit changes. Extra attention is especially important around schools, playgrounds, construction areas and neighbourhood streets.

What Should You Do After the Test?

Whether you passed or failed, take a few minutes to review the result sheet carefully. Do not focus only on the final result. Look at the checked boxes, read the examiner’s handwritten notes and identify any mistakes that occurred more than once.

If you passed, continue practising the areas mentioned by the examiner. Passing the test is an important achievement, but safe driving requires continued attention and experience.

If you were unsuccessful, use the feedback to create a focused practice plan. Instead of repeating the entire road test route, spend more time correcting the specific habits identified by the examiner. For example, if the sheet mentions shoulder checks, speed control or parking margins, practise those skills until they become consistent.

When Can You Retake the Road Test?

ICBC currently requires the following minimum waiting periods:

  • After the first unsuccessful road test: 14 days
  • After the second unsuccessful road test: 30 days
  • After the third or any later unsuccessful attempt: 60 days

These are minimum waiting periods. The next available appointment may be later, depending on booking availability.

Use the waiting period wisely. Practising without understanding what went wrong may reinforce the same habits. A professional instructor can review your result sheet, observe your driving and help you work on the areas that need the most attention.

Important Change Beginning October 19, 2026

Beginning October 19, 2026, British Columbia’s Graduated Licensing Program will change. New drivers will still need to pass the Class 7 road test to move from the Learner stage to the Novice stage.

However, the second road test currently used to move from a Class 7 Novice licence toward a Class 5 licence will be removed. Eligible drivers will instead complete a Driving Record Assessment. After meeting the requirements, they can upgrade to a Class 5 licence with restrictions, including a 12-month requirement for zero blood-alcohol and zero blood-drug content while driving.

These changes do not make safe driving skills less important. Your driving record, daily habits and ability to make safe decisions will continue to matter throughout the licensing process.

Turn Your Results into a Training Plan

An ICBC result sheet is most helpful when it becomes a practical training plan. At Urban Driving Academy, we can review your road test feedback and design lessons around the specific skills that need improvement.

Whether you need help with observation, speed control, parking, highway driving, confidence or preparation for another road test, focused practice can help you avoid repeating the same mistakes.

Bring your result sheet to your next lesson, and we will help you understand the feedback and turn it into safer, more confident driving.

Urban Driving Academy
North Vancouver
Phone: 778-999-9605
Website: urbandrivingacademy.com

Drive Smart. Pass with Confidence.

Urban car spring

How Many Driving Lessons Do You Really Need?

One of the first questions new students and their families ask us is: “How many driving lessons will I need?”

The honest answer is that there is no exact number that applies to everyone. People learn differently, and driving is a practical skill. Learning to drive is a little like learning to swim: some people feel comfortable quickly, while others need more time, repetition and encouragement.

Even two sisters from the same family may need a different number of lessons. That does not necessarily mean one is more intelligent or capable than the other. They may simply have different levels of interest, confidence, coordination or opportunity to practise.

Age Matters, but It Is Not the Whole Story

Age is one of the most important factors in learning a new physical skill. Starting at 16 is different from starting at 35, and this can change the learning process considerably.

However, motivation also matters. A teenager who arrives for a driving lesson immediately after turning 16 has probably been waiting eagerly for that day. If their 17-year-old sibling progresses more slowly, the difference may not be caused by one additional year of age. The younger student may simply be more enthusiastic and willing to practise.

Older learners may sometimes need more repetition, particularly if they feel anxious, overthink their decisions or have never learned a similar physical skill. However, every learner is different, and age alone cannot tell us exactly how many lessons someone will need.

You May Surprise Yourself

If you have never been a good swimmer, soccer player or athlete, do not assume that you will struggle with driving.

We have seen students who considered themselves slow learners become remarkably alert and capable behind the wheel. Driving requires its own combination of observation, judgment, coordination and decision-making. You may discover that you learn it much faster than expected.

Past difficulties do not determine what kind of driver you can become.

What Our Experience Shows

Based on our experience at Urban Driving Academy, most of our students—teenagers and adults—learn the core driving skills within approximately six to twelve professional lessons.

Some students need fewer than six lessons, particularly if they already have some experience or practise regularly between classes. Others may need more than twelve lessons to become comfortable, consistent and ready to drive independently.

These numbers are not a guarantee. The purpose of an initial lesson is also to assess the student’s current ability, learning style and areas that require improvement. A professional instructor can then provide a more realistic recommendation.

Lessons and Practice Are Not the Same

Professional lessons teach you what to do, how to do it correctly and how to recognize and correct mistakes. Practice turns those lessons into habits.

Every student needs practice in addition to professional instruction. A learner who takes one lesson each week and practises regularly with a qualified supervisor will usually progress faster than someone who drives only during their lessons.

The key is simple:

Practice, practice and more practice.

Practice should also be meaningful. Repeating the same easy route is not enough. New drivers should gradually experience different intersections, traffic levels, parking situations, hills and weather conditions while being supervised safely.

What If You Cannot Practise with Your Family?

Not every learner has access to a suitable vehicle or a qualified and confident supervisor. Some parents are also uncomfortable allowing a beginner to practise in the family vehicle.

In these situations, families may choose to complete most or all of the learner’s practice in a driving-school vehicle. Some students therefore take 12, 20, 30 or even more professional lessons. For these families, the additional training is an investment in safety, confidence and peace of mind, while reducing the risks involved in practising with the family vehicle.

Other families prefer to use the driving school mainly for structured instruction. They may book approximately six professional lessons and complete most of the necessary practice in their own vehicle.

Both approaches can work. What matters is that the learner receives correct instruction and enough supervised practice to make those skills consistent.

So, How Many Lessons Should You Book?

There is no perfect number for everyone. Our experience suggests that most students learn the essential driving skills within six to twelve lessons. Some need fewer, while others benefit from additional instruction.

Your age, motivation, confidence, previous experience, learning style and—most importantly—the amount of practice you complete between lessons will all affect your progress.

Do not compare your journey with someone else’s. The goal is not to learn in the fewest possible lessons. The goal is to become a safe, observant and dependable driver.

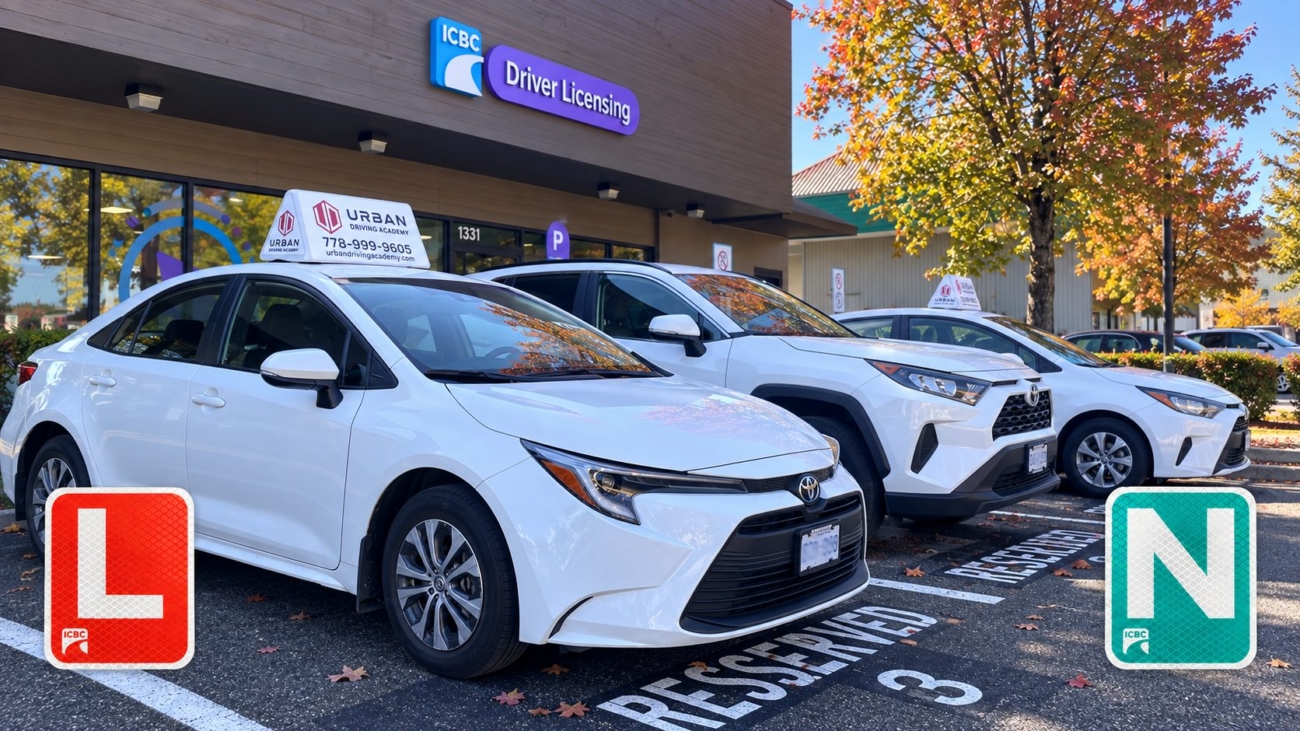
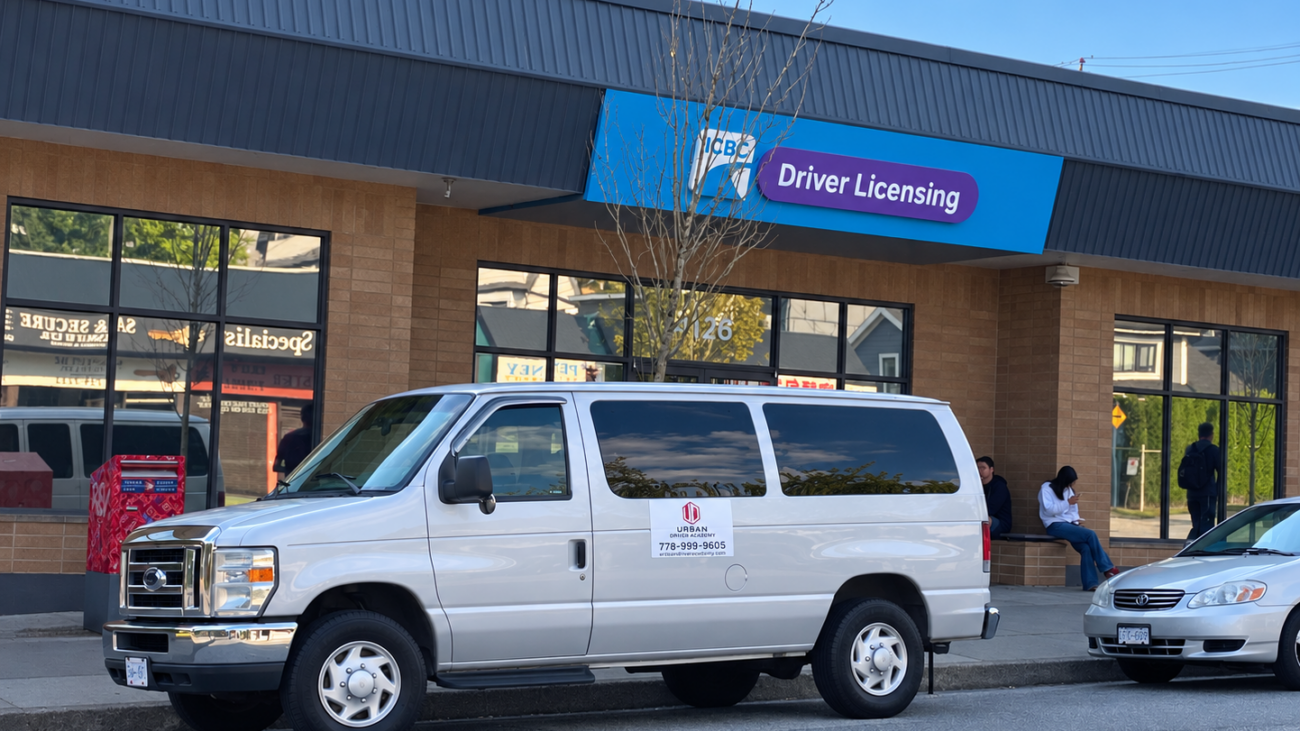
Urban Driving Academy cars at an ICBC driver licensing office with L and N signs

Your ICBC Road Test: How to Prepare and What to Expect


Your road test is not the time to demonstrate a different way of driving. The best preparation is to practise in a variety of situations until you can make calm, attentive decisions. Do not be overly cautious: unnecessary stops and hesitation can create risks. At the same time, do not take chances to appear confident. Move when it is safe, and wait when it is not.

At Urban Driving Academy, we do not believe there is one way to drive for the test and another way to drive in everyday life. The habits you build during lessons should continue to protect you, your family, and other road users long after you receive your licence.

Find out whether you are ready

If you are unsure whether you are ready for your road test, ask an experienced instructor at any reputable driving school to assess your driving. They can identify skills that need more work, such as observation, right-of-way decisions, speed control, turns, or parking. If you have time to practise, focus on those areas before your test.

An assessment is not about finding faults for the sake of criticism. It helps you understand what you already do well and where more practice would make a difference.

What happens when you arrive at ICBC?

Check the arrival time in your booking confirmation and give yourself plenty of time to get to the ICBC office. Bring one primary and one secondary piece of identification accepted by ICBC, payment for the test, and a safe, insured vehicle. Have the vehicle’s licence plate number ready for check-in.

The road test begins with a vehicle safety check. Be ready to demonstrate the hand signals for turning left, turning right, and stopping. Know how to operate the left and right turn signals, low beams and high beams, brake lights, front and rear defrosters, windshield wipers, horn, hazard lights, parking brake, and service brake. Practise using these controls in the vehicle you will bring to the test.

The examiner will explain the test and ask whether you have any questions. You are an ICBC customer. If something is unclear, feel comfortable asking politely. Before the drive is the best time to ask questions about the test. During the drive, you can ask the examiner to repeat or clarify a direction. Turn off your GPS or navigation system, and do not use a phone or recording device during the test.

Check your vehicle before test day

The day before your test, walk around the vehicle. Check the tires, brake lights, turn signals, headlights, windows, seatbelts, and horn. Make sure the insurance is valid and the vehicle has enough fuel or charge. Keep the interior clean and free of items that could interfere with driving or affect the examiner’s safety.

A cracked or illegally tinted window, unsafe tires, a faulty brake light, or a warning light related to safety—such as an airbag warning—may prevent the vehicle from being accepted for the test. Do not assume that a check-engine light or minor cosmetic damage will automatically be accepted or rejected. If you are unsure about the vehicle, contact ICBC before test day. The final decision will be made when the vehicle is checked.

Do the right things for the right reasons

We do not teach shoulder checks simply so an examiner can see you turn your head. A shoulder check helps you see a person or vehicle in your blind spot. Before changing lanes, changing your road position, or pulling away from the curb, check the blind spot on the appropriate side at the right time. When turning right, check to your right for cyclists, pedestrians, and other road users.

A stop at a stop line is not a performance for the test, either. Where a stop is required, come to a complete stop behind the stop line. Then scan the intersection, yield where required, and proceed when it is safe. You do not need to count seconds in your head to make the stop look convincing.

More action does not always mean more safety. Stopping or slowing down without a reason can surprise other drivers. Repeated, poorly timed shoulder checks can take your eyes away from the road ahead when you need them there. What matters is making the necessary checks at the right time, with your attention on the risks around you.

If you make a small mistake, keep driving

The examiner assesses more than one moment. Observation, space margins, speed, steering, and communication with other road users all matter. A small mistake does not necessarily mean you have failed. For example, ICBC says that touching the curb during a parking manoeuvre is not, by itself, a fail. You still need to keep control of the vehicle and complete the manoeuvre safely. A traffic violation or dangerous action can affect the result.

If you do something less smoothly than you hoped, do not keep replaying it in your mind. Bring your attention back to the road and the next decision.

The examiner’s responsibility is to determine whether you can drive without putting yourself or others at risk. If you do not pass, use the feedback to guide your practice. The result may be disappointing, but addressing a weakness before you drive independently can benefit you and everyone who shares the road with you.

Our goal is bigger than passing one test. We want you to arrive safely every time you drive—and to enjoy the journey.

Official ICBC guides


Urban Driving Academy cars at an ICBC driver licensing office with L and N signs

B.C. Graduated Licensing Program Changes in 2026: What L and N Drivers Need to Know


On October 19, 2026, British Columbia’s Graduated Licensing Program (GLP) will change. The biggest change is that eligible novice drivers will no longer need a second road test to move from a Class 7 licence to a Class 5 licence. Instead, ICBC will review their driving record. The changes also affect some L and N restrictions, with different rules depending on the driver’s age. icbc.com

What changes for learner drivers (L)?

Learners will still need to pass a road test to get their N. They must continue to display the red L sign, drive with a qualified supervisor, and follow the other learner restrictions.

Starting October 19, 2026, the minimum age for a qualified supervisor will drop from 25 to 22. Learners will also be allowed to carry more than one passenger if the additional passengers are immediate family members. The other L restrictions, including zero alcohol and drugs, no electronic devices, and no driving between midnight and 5 a.m., remain in place. icbc.com

For learners who are 25 or older, ICBC’s notice says the earliest date for their road test will move forward by three months. Check your updated driving record on October 19 for the date that applies to you.

What changes for novice drivers (N)?

The second road test to leave the novice stage will be replaced by a Driving Record Assessment (DRA). This is a review of your driving history, not another on-road test.

To qualify for a Class 5 licence with a 12-month restriction, drivers under 25 generally need 24 months of safe driving with their N, or 18 months if they completed an approved GLP course during the learner stage. Drivers 25 or older need 12 months of proven safe driving. During the applicable period, ICBC requires no driving prohibitions or suspensions and no convictions for excessive speeding or using an electronic device. Once eligible, drivers who are not included in the one-time automatic upgrade must visit a driver licensing office to complete the upgrade. icbc.com

Do drivers aged 25 or older still need an N sign?

From October 19, 2026, Class 7 novice drivers who are 25 or older will no longer need to display an N sign or have a supervisor when carrying more than one passenger. These changes apply even if they have not yet upgraded to Class 5.

They must still have zero alcohol and drugs in their blood while driving and must not use electronic devices, including hands-free devices. Drivers under 25 must continue to display the N sign and follow the applicable passenger restrictions until they upgrade. icbc.com

What happens after the Class 5 upgrade?

A driver who upgrades under the new process receives a Class 5 licence with restriction 55. For the next 12 months, restriction 55 requires zero blood alcohol and zero blood drug content while driving. The restriction expires automatically after that period, unless a prohibition or suspension causes the period to restart. icbc.com

Will anyone be upgraded automatically?

Some eligible novice drivers will receive a letter confirming a one-time automatic upgrade on October 19, 2026. If you receive that letter, keep your licence valid and maintain an eligible driving record until the change takes effect. ICBC will update your driving record, but it will not automatically mail you a new physical licence. You can continue using your current card until it expires; a replacement card showing Class 5 is optional. icbc.com

If you already have a second road test booked on or after October 19, 2026, ICBC says it will cancel the appointment and email you about the next steps. icbc.com

What should you do now?

Check your driving record on October 19, 2026 to confirm your licence class, restrictions, and earliest eligibility date. Follow the restrictions shown on your updated record, even if the numbers printed on your current licence card differ. You can also review ICBC’s GLP changes page for information specific to your age and licence. icbc.com

At Urban Driving Academy, we see the road test as one milestone in learning to drive. Whether you are working toward your N or building experience before your Class 5 upgrade, our lessons focus on safe habits, clear reference points, and confident driving that lasts beyond any test.